jpinsider
  • Feed
  • travel & culture
  • Beauty
  • Recipes
    • Shop Japanese Groceries
  • About Me

Recipe: Chicken covered in sesame seeds. A healthy alternative for kara-age (fried chicken). All you do is pop it in the oven for 18 minutes. How easy is that? NO OIL recipe.

1/20/2013

1 Comment

 
Picture
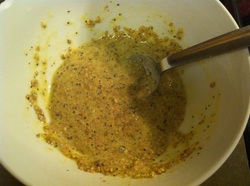
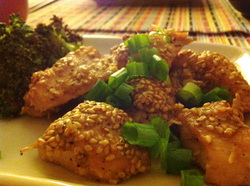
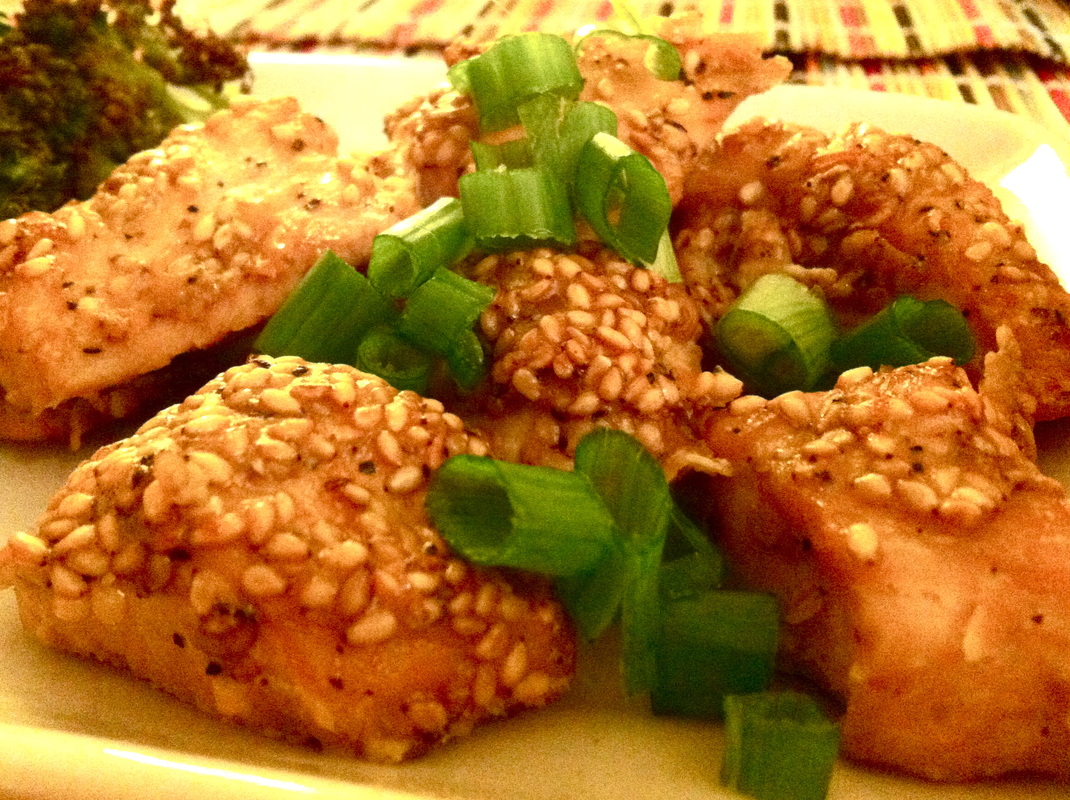
Number of steps:  5 steps
Time taken: 30 min to marinate the chicken (if you choose to)
                      5 min to prepare
                      15 - 20 min in the oven
Approx. 200 kcal per serving

About This Dish:
As you probably know by now, I love fried food. Especially fried chicken! However, now that I'm trying to eat healthy and cut out empty calories from oil and such, "fake" fried food are my best friends. Check out the Fake Katsu Recipe. Doesn't it just feel great knowing that what you made tastes as good as fried food, but is much MUCH healthier? This recipe, like the Fake Katsu Recipe uses absolutely no oil. Additionally, I've used very lean chicken. The crunchiness of the sesame seeds and the marinate prior gave this chicken a fantastic taste which reminded me of a dish back in Japan; Kara-age (Fried chicken with coating)! 

What You Need:
(For 4 servings)
  • 1lb chicken (I used boneless, skinless chicken breast from Costco. Any chicken meat will work though!)
Marinate:
  • 2 tbsp Japanese soy sauce
  • 2 tbsp Japanese sake
  • 1 - 2 tsp grated ginger
  • 1 - 2 tsp grated garlic
Coating:
  • 1 large egg
  • 5 tbsp sesame seeds
  • 1 tbsp potato starch (If you don't have starch, you can use 2 tbsp flour too)
Picture
1. Cut up the chicken into bite sized pieces.


Picture
4. Place the chicken into the coating and mix till thoroughly spread.

Picture
2. In a ziploc bag, put in the chicken, soy sauce, sake, grated ginger and grated garlic. Marinate for 30 minutes in the fridge. If you don't care much for the taste, you can skip the marinating.

Picture
5. Place the chicken onto a piece of foil on a oven safe pan. I always like using foil to make the clean up easier :) Place in the oven for 15-20 minutes. 

Picture
3. Make the coating of the chicken. Simply mix the sesame seeds, egg and starch. Preheat the oven to 400F-440F.


Picture
Serve with rice, miso soup, veggies on the side! You can dip it into Japanese mayo, ketchup or any favourite sauce of yours.

1 Comment

Recipe: Japanese Omurice! Omelette made with fried rice. Want to impress your significant other? Whip this up for dinner tonight! 

1/10/2013

0 Comments

 
Picture
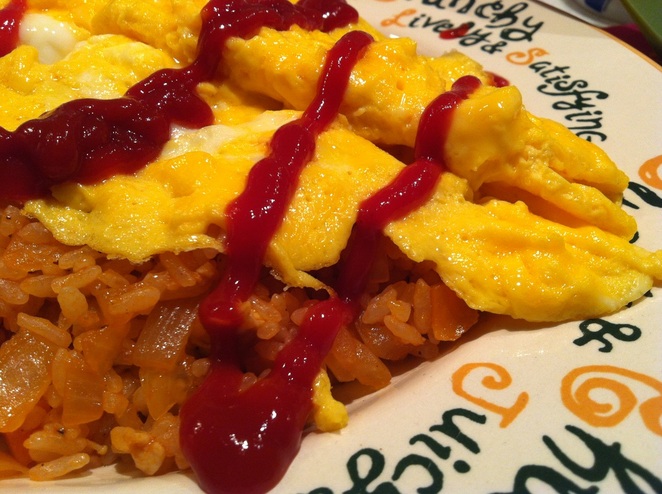
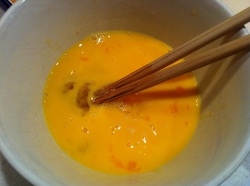
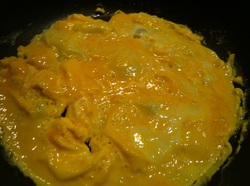
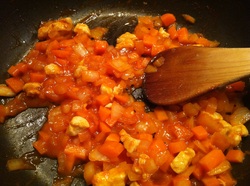
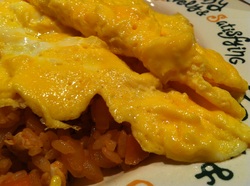
Number of steps:  9 steps
Time taken: 15 - 20 min

About This Dish:
Omurice is essentially a soft and fluffy omelette topped on chicken rice which is usually ketchup flavoured. Some people wrap the chicken rice into the omelette and some top the omelette carefully on top of the bed of rice. This dish is popular as a homemade dish and as a lunch/dinner dish in western restaurants. You could add some more ketchup on top of the dish or pour beef stew on top (a.k.a. Hayashi rice, which I will post in the future). I cannot tell you how great the rice tasted. It tasted as though I had been cooking it for hours or in my crockpot! 

What You Need:
(For 2 dishes)
  • 2 cups of rice (Of course, I used Japanese rice. Usually rice previously in the fridge works best)
  • Mixed vegetables (I used half an onion and some carrots)
  • 50g of chicken (around 2oz)
  • 1-1.5 tbsp of butter
  • 2 tsp soup stock powder/cube
  • 100ml water (0.4 cups)
  • 2 tbsp ketchup (Adjust as needed, I ended up putting a little more than this)
  • 1 tsp sugar
  • Pinch of salt and pepper
  • Oil
  • 4 eggs (2 eggs per person shall do!)
  • Optional: Couple tsp of milk
Picture
1. Cut the veggies and chicken into small pieces like the photo. Heat up a pan, place the butter, then throw in the veggies and chicken. Cook until the onion becomes fairly clear.


Picture
4. Add the rice and season with salt and pepper as you wish! I personally would recommend adding warm rice to the mixture.


Picture
7. Once you make sure the pan is hot hot HOT, pour in the egg. I put my heat up to HIGH here.

Picture
2. Add the soup stock, water, ketchup and sugar to the mixture and as you continue to stir, cook it on MEDIUM heat. Make sure to keep mixing to avoid any burns! 


Picture
5. In a bowl, crack open 2 eggs and add a tsp of milk and mix roughly. Don't over mix.


Picture
8. Mix the egg 3-5 times in a circle using a utensil and remove from heat.

Picture
3. Cook the mixture until most of the water evaporates. This is very important. We don't want the rice to be soggy.


Picture
6. Heat up a different pan with 1-2 tbsp of oil. I know this could sound like a lot of oil, but it helps make the egg fluffy.


Picture
9. Top the egg carefully on top of the bed of rice and add your favourite sauce on top. I would just go with ketchup on lazy nights. 


Note: If you want to wrap your chicken rice with the egg, simply put the bed 
of rice on top of the egg at step 7. Place on the edge so you can roll the egg up like an omelette!
0 Comments

Recipe: Fake chicken katsu. Not deep fried but baked in the oven instead. Definitely healthier, easier and delicious! Absolutely NO OIL is used! 

12/20/2012

7 Comments

 
Picture
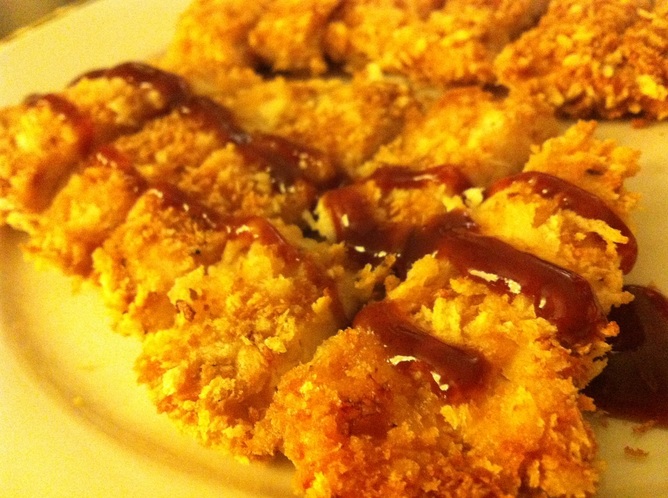
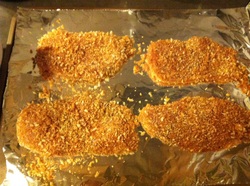
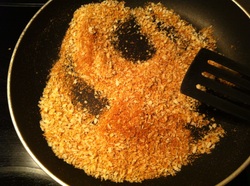
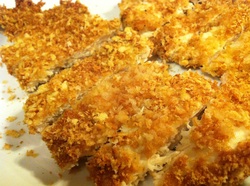
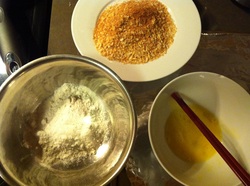
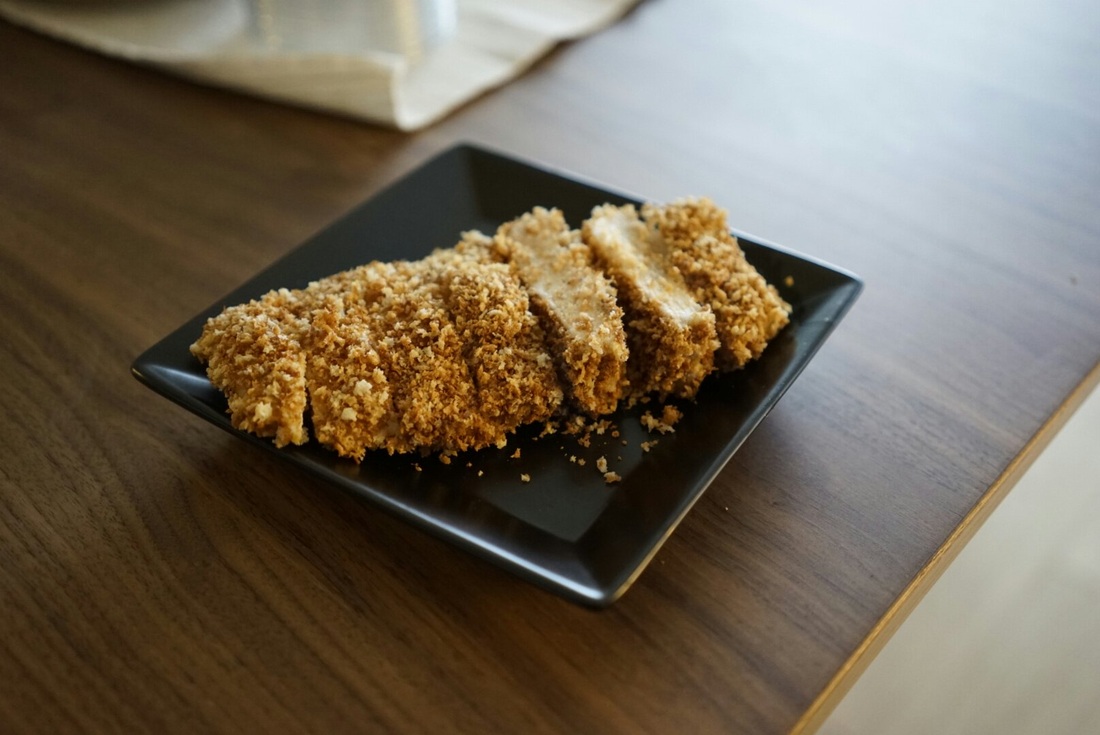
Number of steps:  5 steps
Time taken: 10 min to prepare, 25 min in the oven

About This Dish:
I love pork or chicken katsu but we all know that it can be unhealthy since it's deep deep fried. So since I love the crunchiness of the bread crumbs that is the result of deep frying, is there a way to replicate that? The answer is Yes! I found a bunch of recipes out there which made chicken/pork katsu WITHOUT deep frying. 

We will pop it in the oven instead. Absolutely no oil used in this recipe! You can also use this recipe for chicken or pork katsu. If you are using thicker meat, adjust the time in the oven appropriately.

What You Need:
(4 chicken katsu fillets)
  • 4 thin chicken fillets
  • Bread crumbs/Panko
  • All purpose flour
  • 1 egg (Use as much as needed)
  • Salt & pepper
Picture
1. Get the chicken fillets and put some salt and pepper on it as prep. Pre heat the oven to 390F - 400F.


Picture
4. On a oven safe tray, place the fillets on top of a sheet of aluminum foil. Place in the oven for approximately 25 min.

Picture
2. Take a good amount of panko (bread crumbs), maybe 1-2 cups, and start roasting it on a heated pan until it turns golden brown. This will make the crumbs crunchy, giving it the same effect as when you deep fry it.


Picture
5. Once it is done, cut it up and serve with Japanese katsu sauce, rice and miso soup.

Picture
3. Place each fillet in the flour, then the egg and finally the bread crumbs.

7 Comments

Recipe: Tandoori chicken made with drumsticks made from a Japanese perspective. Marinate for a couple hours and pop it in the oven! 

11/14/2012

0 Comments

 
Picture
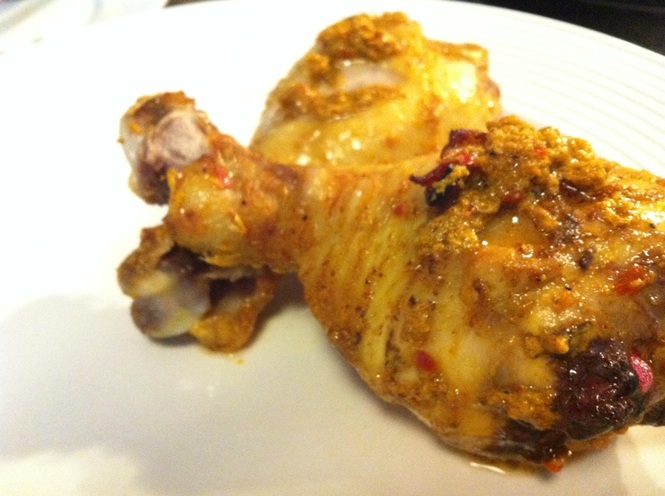
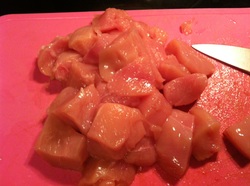
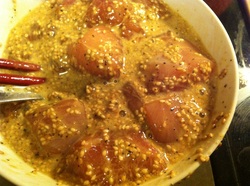
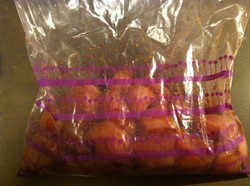
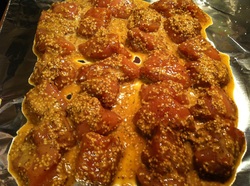
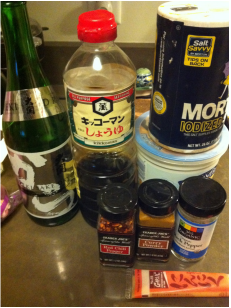
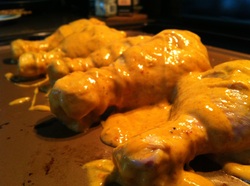
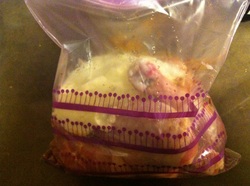
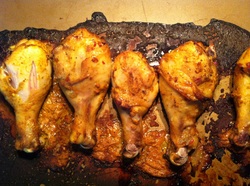
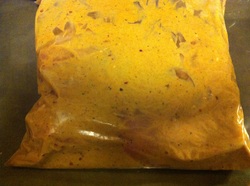
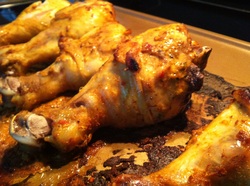
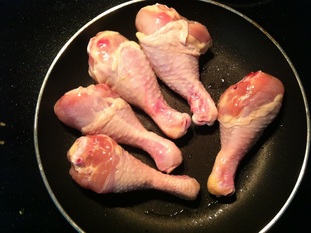
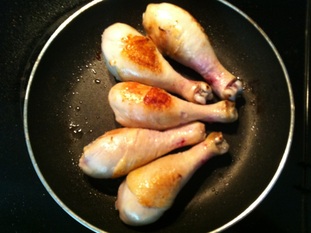
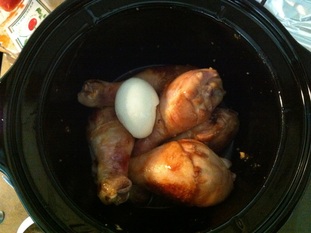
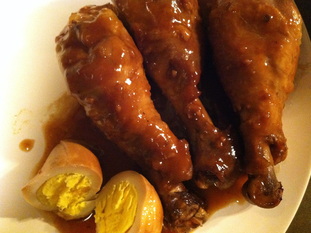
Number of steps:  5 simple steps
Time taken: 3 min to prepare ,marinate for 2 hours or overnight, and 40 min in the oven
Approx. 300 kcal per 6oz (large) drumstick

About This Dish:
I recently bought chicken drumsticks at Trader Joes for $2.50! It came with 5 large drumsticks totaling to 1.88lb. So what did I do with them? I made Japanese style tandoori chicken drumsticks! I can't emphasize enough how EASY this was. It took me 3 minutes to mix the ingredients, I left it to marinate overnight, and then I put it in the oven for 40 minutes while I did some yoga. It came out absolutely DELICIOUS. My boyfriend and I finished ALL drumsticks for lunch. Since I marinated it overnight, I could taste the amazing seasoning even in the center of the drumstick.

What You Need:
(For 5 or 6 large drumsticks, mine were 6oz each)
  • 5 or 6 large chicken drumsticks
  • 300g (or around 1 cup) of plain yogurt 
  • 1/2 tbsp of salt
  • 1/2 tbsp of pepper
  • 3 tbsp of curry powder
  • 1 tbsp of soy sauce
  • 3 or 4 tbsp of Japanese sake
  • 1 tsp of grated garlic
  • 1 tbsp of chili powder or chili 
Picture
Just a quick shot of all the ingredients! 

Picture
3. Preheat your oven to 390F. Once you have marinated the chicken, take it out and place it on a oven safe pan. You could also place cookie sheets underneath if you like (for a mess-free approach). 

Picture
1. In a ziploc bag, put in ALL the ingredients and MIX. Use your hands and just massage the chicken.


Picture
4. Place it in the oven for 20 min. After 20 min, flip the chicken and place it in the oven for another 20 min; that's 40 min total! You may smell burns but don't worry that's most likely the sauce burning on the pan. The chicken will be PERFECT, I promise.

Picture
2. This is what it should look like after you mix it! Place it in the fridge and let it marinate for 2 hours or more. Preferably overnight! 


Picture
5. Once you've cooked the chicken for 40  minutes total, take it out and cut into a piece of 1 drumstick to check if it is cooked through. Serve with rice and veggies! 

0 Comments

Recipe: Healthy chicken tofu patties with teriyaki sauce! Stop buying the expensive pre-made teriyaki sauce and make it yourself instead ;)

11/11/2012

1 Comment

 
Picture
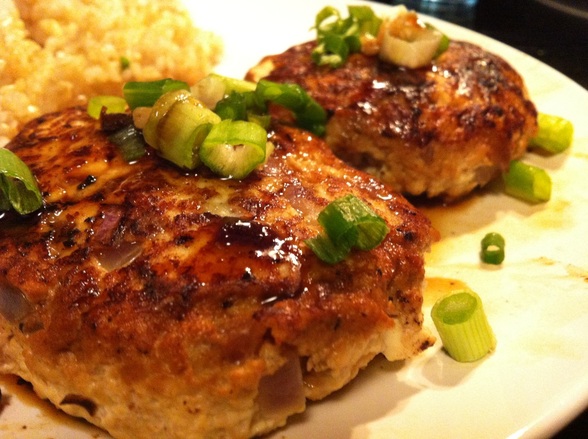
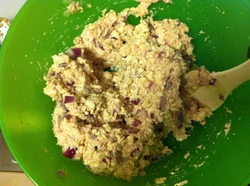
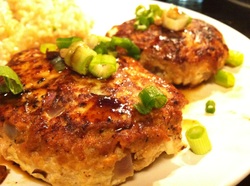
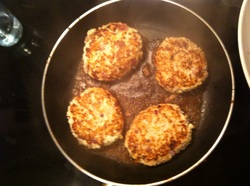
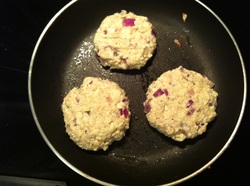
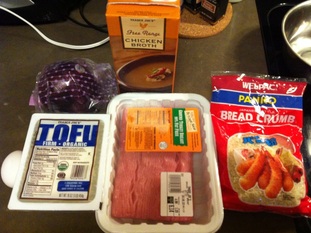
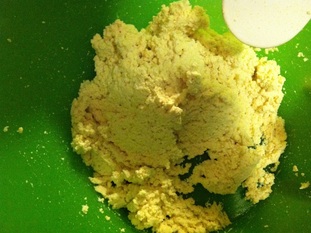
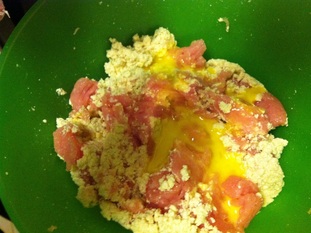
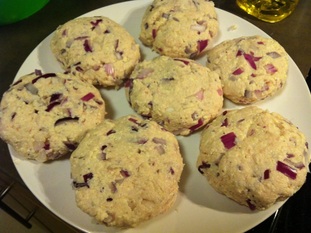
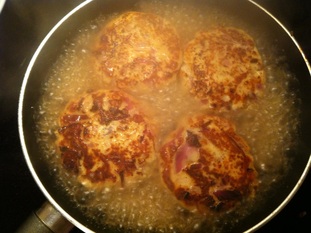
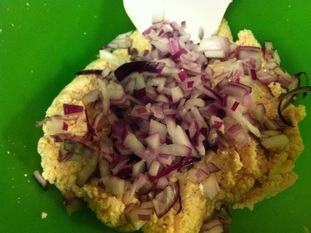
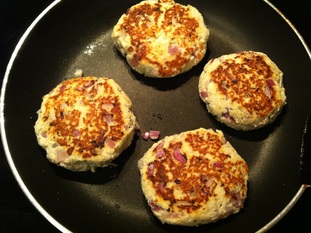
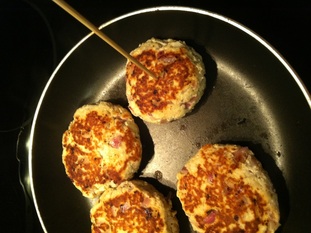
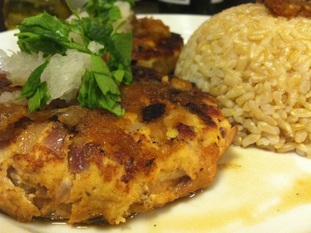
Number of steps:  10 simple steps
Time taken: 20-30 min 
Approx. 100kcal per patty

About This Dish:
Tofu hamburgs are healthy, filling and are easy to make! Most of all, you can saran wrap each one and store them in the freezer and eat it for lunch and dinner whenever you want. Drizzle some homemade teriyaki sauce on top of these patties and serve with rice and veggies. 

What You Need:
(Makes 7 patties)
  • 1/2 lb Ground chicken 
  • 1 tofu (I bought the medium firm tofu at Trader Joes)
  • 1/2 onion
  • 1/2 - 1 tbsp of grated or chopped ginger 
  • Salt and pepper to taste
  • (optional) Garlic, 1 egg in the mix to hold all the ingredients better (if you want)
Teriyaki sauce
  • 2.5 tbsp Japanese soy sauce
  • 2 tbsp Japanese sake
  • 2 tbsp sugar
  • 1 - 2 tbsp mirin
Picture
1. Wrap the tofu in kitchen paper towels and put it in the microwave for 1 - 2 minutes. We want to drain the water out of the tofu! After it cools down, drain more water out.

Picture
4. Add the onions and mash further. Add the ginger, salt, pepper and any other tastes you want to add. 


Picture
7.  Once you see a nice burn, flip over the patties and do the same.


Picture
10. Once you place the patties out of the pan, start making the sauce using the same pan. Pour in all the ingredients for the sauce mentioned above and mix on LOW, VERY LOW heat. 

You'll see that the sauce will get more dense and thick. Taste it as you go and once you're happy with it drizzle it on the patties. You can add a couple pinches of flour to make it more saucier if you like.

Picture
2. Start grilling the onions with some olive oil until it turns clear.


Picture
5. Put some oil on your hands and start shaping the patties. I made mine about the size of my palm. Don't make it too thick or else it'll be harder for the heat to go through when cooking.

Picture
8. Turn the heat down to MEDIUM HIGH heat and pour in 1/2 or less of water and close the pan shut with a lid. This procedure will help the patties to get more poofy and soft inside while cooking it through completely.

Picture
3. Mash the tofu in a bowl.


Picture
6. Place some olive oil on a pan on HIGH heat. Once the oil is heated, place the patties on the pan and heat until you see a nice burn.


Picture
9. After 1-2 minutes, check if there is water leftover. If not, your patties are done! If there is water, cover shut until the water is gone.

1 Comment

Recipe: Japanese gyoza! Panfried potstickers anyone should try!  Mine are made with ground chicken and shrimp. 

10/27/2012

1 Comment

 
Picture
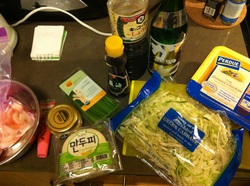
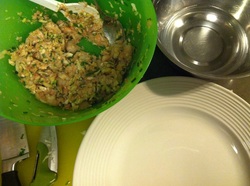
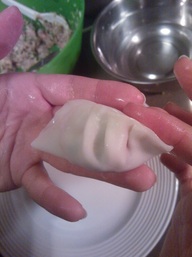
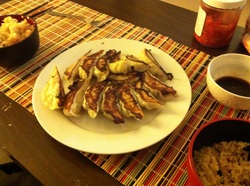
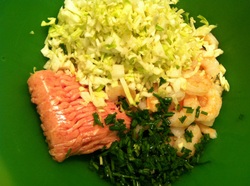
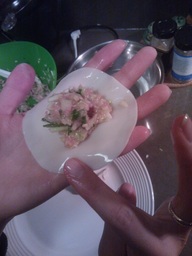
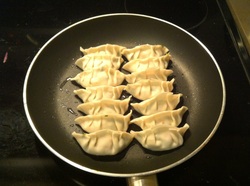
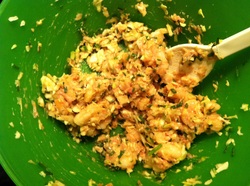
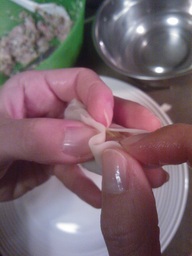
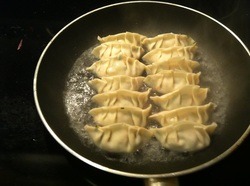
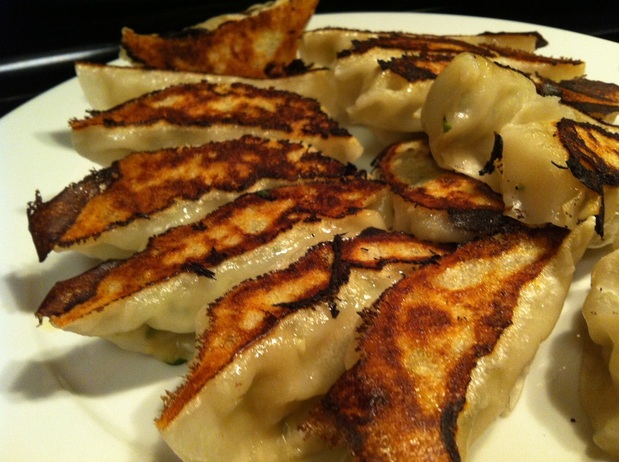
Number of steps:  6
Time taken: Approx. 15 - 20 min
Approx. 30 calories per potsticker (~7-10 potstickers should be 1 serving)

About This Dish:
Originally from China, gyozas are super easy to make and you can get as creative as you want in regards to the ingredients you put in. In Japan, we pan fry potstickers! The majority of Japanese people LOVE gyozas since it goes so well with beer. Of course, kids like it too. It goes so well with white rice! You'll find so many restaurants which specialize in making great gyozas in Japan, but it's a popular meal to make at home too. I've used ground chicken and shrimp to get this amazing chewiness and juiciness :D

What You Need:
(Makes around 30 gyozas)
  • 1/4 pound of ground chicken 
  • 20 little shrimps (I use the frozen ones)
  • Handful of chives (I got mine at Shaws)
  • A lot of shredded cabbage (Feel free to put in as much veggies as you want!)
  • 1 piece of ginger (I used chopped ginger)
  • 1 clove of garlic (I used minced garlic)
  • 1 tbsp of soy sauce
  • 1 tbsp of sake
  • 1 tbsp of sesame oil
  • Gyoza wrappers (I buy them at the asian store or Wholefoods)
Picture
Here are the ingredients!


Picture
3. Prepare for the wrapping session. Grab a bowl and put some water in it. The water will act as the glue when wrapping up the potstickers.


Picture
4.3 Once you're done with one side, repeat the folds on the other side. 

Picture
Take the lid off after 5 minutes and you are done! Serve with rice and sauce (soy sauce + sesame oil). Regular super markets sell "gyoza sauce" too. 

Picture
1. Place the ground meat, shrimp,chives, shredded cabbage into a bowl and mix! Make sure to squash the shrimp up into little pieces.

Picture
4. First place a spoonful of the mix on to the wrapper. Then dip your finger into the water and wet the edges of the wrapper.

Picture
5. Once you're done wrapping up all the gyozas, heat up the pan on HIGH heat and place 1 tbsp of oil. Once the oil and pan is hot hot hot, place the gyozas in rows.

Picture
2. We want the mix to be gooey. Now add the ginger, garlic, soy sauce, sake and sesame oil. Mix further.


Picture
4.2 Close the wrapper from the middle and start making folds on one side like the photo above.


Picture
6. Right after you place the gyozas in the pan, pour in 1/2 glass of water. We want to cover up a little less than a third of the gyozas. Put a lid on it and wait for 5 minutes!

1 Comment

Recipe: Super healthy Japanese style Tofu Turkey Patty! (Tofu Hamburg)

10/8/2012

0 Comments

 
Picture
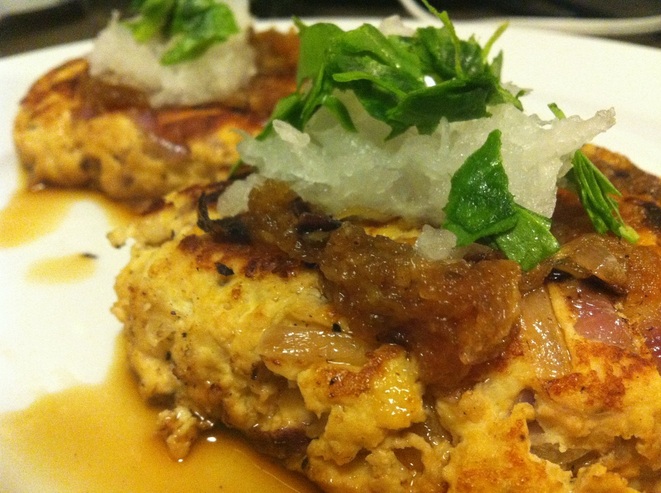
Number of steps: 10  (...but very easy!)
Time taken: 30 min
Aprrox. 150kcal per large patty.

About This Dish:
Craving Japanese style beef hamburgs? I crave those, but I love these tofu hamburgs even more given the fact that they are super super super healthy, and easy to make! You can make a bunch and freeze them up too. How convenient can it be?

What You Need:
(for 8 large tofu hamburgs)
  • 1 firm tofu (They sell it most grocery store now!)
  • 300g Ground turkey (1/2 - 2/3 of a pound, you can also use ground chicken) 
  • 1 cup Japanese panko (bread crumbs, they also sell these at the asian section of most grocery stores)
  • 1/2 large onion
  • 1 egg
  • Salt, pepper
Sauce
  • About 10 cm of Japanese radish 
  • 2 tbsp Japanese soy sauce
  • 1 tbsp mirin
  • 1.5 tbsp Japanese sake (or any wine)
Picture
Here are your ingredients, please ignore the chicken broth, I have no clue why it's there! 

Picture


2. Get rid of the unnecessary water which of the tofu. I just pressed it hard until water stopped dripping.

Picture
Here's the tofu after crushing it thoroughly.

Picture
5. Add an already mixed egg, and ground turkey. Mix very well! 

Picture
7. Using your hands, create the patties! I made them quite big as you can see ;)

Picture
9. Add 1/2 cup of water into the pan and close it with a lid! This will steam the hamburgs and cook it well inside.


Picture
11. As for the sauce: grate the radish and place HALF of it into a microwavable bowl. Add the soy sauce, mirin and sake and microwave for 2 minutes! Yup, that's it.

Picture
1. Let's start! Chop up the onion in small, tiny pieces. Smaller the better! 

Picture
3. Start crushing the tofu in a large bowl using a whisk. We want to make it a paste!

Picture
4. Little by little, add the panko into the tofu.

Picture
6. Once you've mixed it very well, add the onions and mix thoroughly.

Picture
8. Put them on a pan on HIGH heat. Flip them over once you see a nice burn and wait for a nice burn on the other side.

Picture
10. After 3 -5 minutes , take of the lid. If the water is all gone and your hamburgs seem cooked inside, you're all done! 

Picture
Final: Top the hamburgs with the sauce and some fresh grated radish! Enjoy!!

Picture


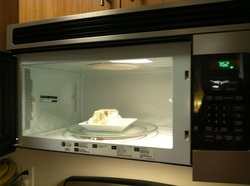
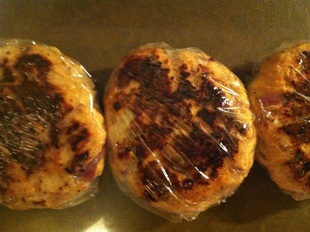
Note: Wrap them up with plastic wrap and freeze them! You can reheat on the pan or on the microwave. Very helpful on those busy days.
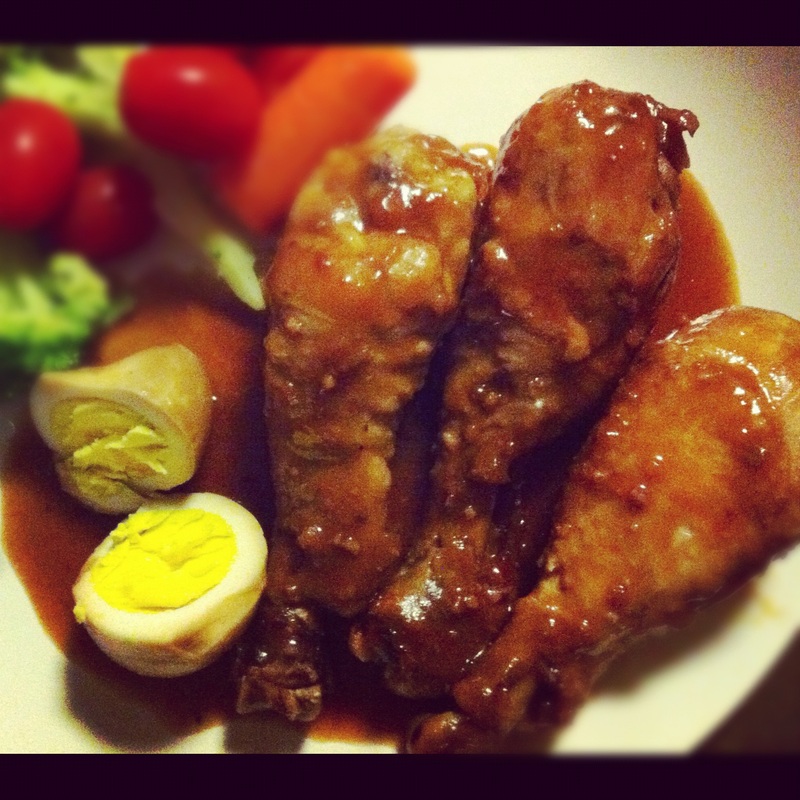
0 Comments

Recipe: Finger-Lickin' Good but Too Easy! Drumsticks Simmered in Japanese Soy Sauce Mix.

9/28/2012

0 Comments

 
Picture
Number of steps: 4   (Super easy!)
Time taken: Simmer for 1-2 hours. 
Approx. 200kcal per large drumstick.


About This Dish:
Drumsticks are always in my fridge since they are so cheap and easy to toss into my slow cooker. This Japanese sauce made mainly of soy sauce is so savory , thick and delightful. I've never tasted this sauce in Asian restaurants located in Boston but, it's easy for anyone to have and enjoy; even those who are not used to Asian food. Definitely defines "finger licking good". It's also a healthy alternative compared to deep fried chicken drumsticks! 


What You Need:
(for 6 chicken drumsticks)
  • 6 chicken drumsticks
  • 2 eggs 
Sauce
  • 100ml Japanese soy sauce (a little less than 1/2 cup)
  • 100ml brown sugar (a little less than 1/2 cup)
  • 60ml of ketchup or tomato sauce (1/4 cup)
  • 30ml Japanese mirin (1/8 cup)
  • 30ml water (1/8 cup)
  • 1-2 cloves of garlic (minced)
  • 1-2 pieces of ginger (minced)
  • 1.25 tsp of oyster sauce or hoisin sauce
  • 1 tbsp of corn starch (I used 2 tbsp of flour instead since I had run out of corn starch)
Other
  • spring onion to decorate 


Notes:
If you don't own a slow cooker that is completely fine. You can just use a regular pot and cook it on low heat! 
Picture
1. Put the chicken drumsticks onto a pan and fry it until you see a nice colour to it. While you do this, make a boiled egg in a different pot! 

Picture
2. Once the chicken gets a nice brown colour, turn off the heat and make sure your egg is boiled, peeled and ready to go too.

Picture
3. In a slow cooker (If you don't have a slow cooker, just use a regular pot and cook it on low heat), put in all the ingredients for the sauce except for the corn starch and spring onions. It might be a good idea to mix all of the ingredients in a separate bowl before you put it in the slow cooker. Let this cook for 2-3 hours. Give it a mix a couple times while it is cooking to make it cook evenly. 

Picture
4. Once you let it simmer for 2-3 hours, let the chicken and egg out on a plate, and mix in the corn starch (or flour) with a little bit of water and pour it into the left over sauce in the pot. This will make the sauce heavier. Once that's done, pour it over your chicken and eggs and you will be ready to devour it! 

0 Comments
Forward>>

    Subscribe via email

    ​Featured Fyuse:

    Popular Posts

    Picture
    Kinkakuji, Kyoto
    Picture
    Non-oil Chicken Katsu
    Picture
    Kawaii! Socks

    instagram: @jpinsider

    Categories

    All
    About Japan
    Appetizer
    Beef
    Chicken
    Dessert/sweets
    Dinner
    DIY
    Egg
    Japanese Breakfast
    Japanese Food
    Japanese Music
    Japanese Quality Series
    Japanese Recipes
    Lunch
    Matcha/green Tea
    Noodles
    Obento
    Pasta
    Pork
    Potato
    Rice
    Salmon
    San Francisco
    Sauce
    Savoury
    Seafood
    Side Dishes
    Tips/how To
    Tofu
    Traveling Japan
    Tuna
    Turkey
    Vegetables
    When In Tokyo
    Yokohama

Powered by Create your own unique website with customizable templates.
  • Feed
  • travel & culture
  • Beauty
  • Recipes
    • Shop Japanese Groceries
  • About Me